


Langchain provides a robust framework that simplifies the creation of chatbots. With memory capabilities, your chatbot can remember past interactions, providing a more context-rich experience for users. Let's dive into how this works.
Why Use Langchain and Langgraph?
Langchain is perfect for building interactive applications with conversational AI. It helps manage chat models and integrates with various services to enhance functionality. In our case, it allows us to easily use a language model from OpenAI.
Langgraph complements this by helping manage the flow of conversations in a structured manner. You can think of it like setting up a roadmap for conversation, defining how messages travel and get processed through various states.
The Importance of Memory
A chatbot with memory can lead to more meaningful exchanges because it remembers what you’ve talked about before. In our setup, we’ll use PostgreSQL for this memory. It acts as the chatbot's brain by storing conversation states and allowing easy retrieval for future interactions.
Getting Started
Step 1: Set Up the Environment
Before anything else, you need to have the essential packages installed. Create a requirements.txt file with the following dependencies:
langchain-core
langgraph-checkpoint-postgres
langgraph>0.2.27
langchain[openai]
psycopg
psycopg[binary,pool]
Install the required packages using:
pip install -r requirements.txt
This will ensure you have all necessary tools to make our chatbot functional.
Step 2: Install PostgreSQL and set up your database server
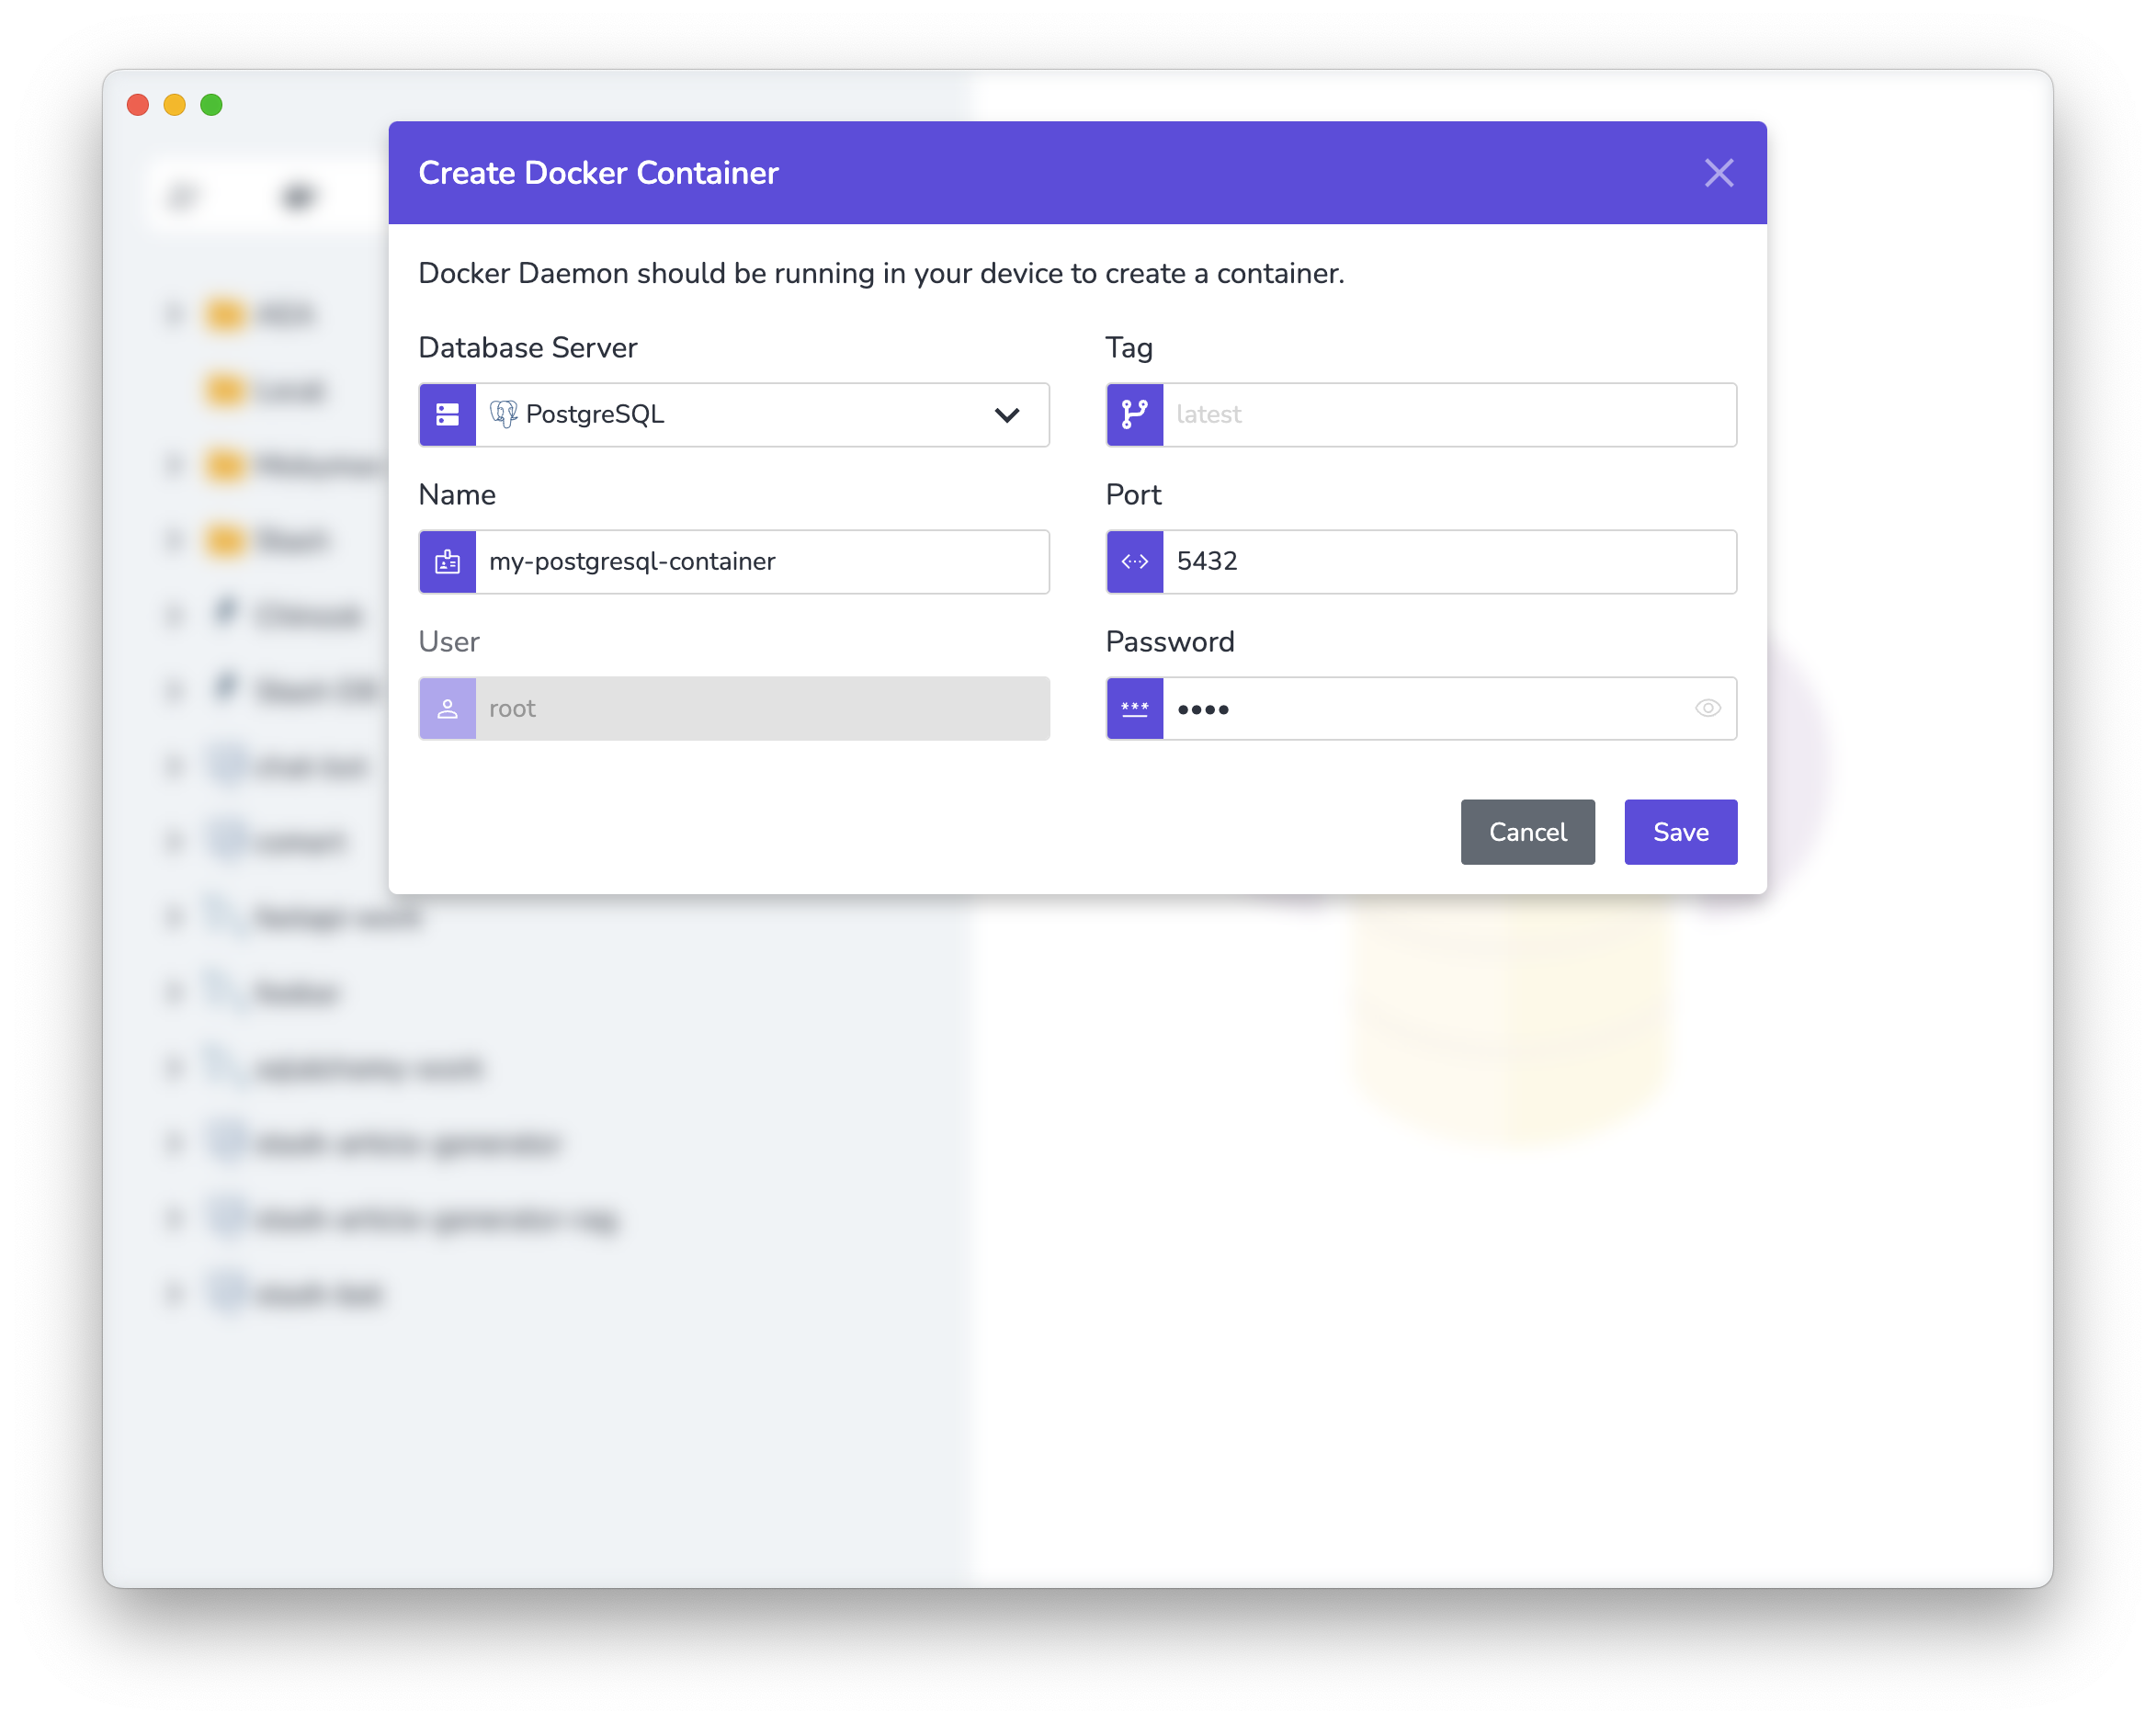
Since installing and configuring PostgreSQL is not the subject of this article, I will not go into detail about the installation. However, by installing Docker and Stash on your computer, you can create a Docker container for a PostgreSQL instance with a single click via Stash, assign a port, and make it work.
If you want to quickly create a PostgreSQL instance, first download and install Docker from here to your computer.
Then download Stash from here and install it on your computer.
Click on the Docker icon in the sidebar on the left and create a PostgreSQL container by entering the container information in the dialog. Stash will create a PostgreSQL instance on Docker for you and allow you to use it quickly.
Step 3: Initialize Environment and Model
We should set the API key for OpenAI. This key allows access to the language model that powers our chatbot:
os.environ["OPENAI_API_KEY"] = "Your OpenAI API Key"
Then, we initialize the chat model, choosing gpt-4o-mini from OpenAI as our model. This acts as the engine for understanding and generating responses:
model = init_chat_model("gpt-4o-mini", model_provider="openai")
Step 4: Define the Graph and Prompts
We create a state graph to manage communication flow, establishing a framework for message states. The StateGraph structure maintains how conversations proceed:
workflow = StateGraph(state_schema=MessagesState)
We also set up prompts for the chatbot. Here, Wojak, our chatbot, is introduced as a friendly assistant. Using ChatPromptTemplate, we define the chatbot's personality and expectations:
prompt_template = ChatPromptTemplate.from_messages(
    [
        (
            "system",
            "Your name is Wojak. You are a chatbot and AI assistant. Your job is to chat with people and help them with their problems. You are a friendly and helpful AI.",
        ),
        MessagesPlaceholder(variable_name="messages"),
    ]
)
Step 5: Call the Model and Define Workflow
The call_model function handles generating responses. It prepares the prompt using current conversation state and requests responses from the language model:
def call_model(state: MessagesState):
    prompt = prompt_template.invoke(state)
    response = model.invoke(prompt)
    return {"messages": response}
Next, we configure the workflow by defining nodes and edges. This setup directs how messages move through the chatbot's model:
workflow.add_edge(START, "model")
workflow.add_node("model", call_model)
Step 6: Configure Memory with PostgreSQL
We establish a connection to a PostgreSQL database, which serves as our chatbot's memory bank. Using PostgresSaver, we manage conversation states efficiently, ensuring our chatbot can remember interactions:
DB_URI = f"postgresql://root:root@localhost:5432/postgres?sslmode=disable"

connection_kwargs = {
    "autocommit": True,
    "prepare_threshold": 0,
}

pool = ConnectionPool(
    conninfo=DB_URI,
    max_size=20,
    kwargs=connection_kwargs,
)

checkpointer = PostgresSaver(pool)

if not os.path.exists("setup.txt"):
    checkpointer.setup()

    with open("setup.txt", "w") as f:
        f.write("Setup completed.")
Step 7: Compile and Launch the Chatbot
Compile the workflow, incorporating our PostgreSQL-backed memory. This makes the chatbot capable of maintaining context through interactions:
app = workflow.compile(checkpointer=checkpointer)
We create a config object that holds a thread ID for our conversation. If you change the thread ID, the chatbot's memory will reset, as the chat history is maintained by the thread ID.
config = {"configurable": {"thread_id": "abc12345"}}
Finally, we begin the conversation loop. The chatbot processes inputs continually, delivering responses until the user decides to exit:
while True:
    query = input("> ")

    if query == "exit":
        break

    input_messages = [HumanMessage(query)]
    for chunk, metadata in app.stream(
        {"messages": input_messages, "language": "English"},
        config,
        stream_mode="messages",
    ):
        if isinstance(chunk, AIMessage):
            print(chunk.content, end="")

    print("\n\n")
Run the Script
You can find the full source code below:
import os
from langchain.chat_models import init_chat_model
from langchain_core.messages import HumanMessage, AIMessage
from langchain_core.prompts import ChatPromptTemplate, MessagesPlaceholder
from langgraph.graph import START, MessagesState, StateGraph
from langgraph.checkpoint.postgres import PostgresSaver
from psycopg_pool import ConnectionPool

os.environ["OPENAI_API_KEY"] = "Your OpenAI API Key"

# Initialize model
model = init_chat_model("gpt-4o-mini", model_provider="openai")

# Define a new graph
workflow = StateGraph(state_schema=MessagesState)

# Create a prompt template
prompt_template = ChatPromptTemplate.from_messages(
    [
        (
            "system",
            "Your name is Wojak. You are a chatbot and AI assistant. Your job is to chat with people and help them with their problems. You are a friendly and helpful AI.",
        ),
        MessagesPlaceholder(variable_name="messages"),
    ]
)

# Define the function that calls the model
def call_model(state: MessagesState):
    prompt = prompt_template.invoke(state)
    response = model.invoke(prompt)
    return {"messages": response}

# Define the (single) node in the graph
workflow.add_edge(START, "model")
workflow.add_node("model", call_model)

# Create a checkpoint to save the model's state
DB_URI = f"postgresql://root:root@localhost:5432/postgres?sslmode=disable"

connection_kwargs = {
    "autocommit": True,
    "prepare_threshold": 0,
}

pool = ConnectionPool(
    conninfo=DB_URI,
    max_size=20,
    kwargs=connection_kwargs,
)

checkpointer = PostgresSaver(pool)

# We don't need to setup checkpointer after it has been initialized.
if not os.path.exists("setup.txt"):
    checkpointer.setup()

    with open("setup.txt", "w") as f:
        f.write("Setup completed.")

# Add memory
app = workflow.compile(checkpointer=checkpointer)

# Chat configuration
config = {"configurable": {"thread_id": "abc12345"}}

# Start the conversation
while True:
    query = input("> ")

    if query == "exit":
        break

    input_messages = [HumanMessage(query)]
    for chunk, metadata in app.stream(
        {"messages": input_messages, "language": "English"},
        config,
        stream_mode="messages",
    ):
        if isinstance(chunk, AIMessage):
            print(chunk.content, end="")

    print("\n\n")
When you first run the script, the chatbot will not be able to answer questions you ask about yourself because it does not know you. However, even if you close the script and run it again after introducing yourself, previous conversations will be loaded from memory and the chatbot will recognize you based on the answers you have given before.
Conclusion
By using Langchain and Langgraph, paired with PostgreSQL for memory, you can create a chatbot that doesn’t just chat but remembers. This memory feature helps our AI chatbot provide a more dynamic and personalized interaction. As you expand on this model, keep experimenting with different prompts and memory strategies to create even richer user experiences.